You have 0 items in your cart
Cleaning your ears might not be the most glamorous topic, but it’s essential for your overall well-being. Plus, when you’re into ear acupressure and ear seeds like we are, a clean canvas is crucial for optimal results!
Let’s dive into the nitty-gritty of how to clean ears at home, including the dos and don’ts. Finally, we’ll discuss how ear seeds can complement your ear hygiene routine.
How often should you clean your ears?
You might be surprised to learn that your ears are self-cleaning to some extent. Earwax, or cerumen, naturally moves towards the ear opening and then dries up, eventually falling out.
Earwax is produced by glands in the ear canal and serves as a protective barrier. It traps dust and foreign particles, preventing them from reaching the eardrum. Do not attempt to remove all earwax, as it plays a crucial role in ear health. Over-cleaning can strip the ear canal of its natural oils, leading to dryness and discomfort.
A general rule of thumb is to clean ears lightly each time you bathe or shower. If you work out and sweat a lot or are exposed to heavy levels of smoke, smog, or other pollutants or irritants, you might need to do it more often. But be careful not to overdo it. Excessive cleaning can irritate your ears.
Don’t forget to clean whatever touches your ears, too
Phones, headphones, yoga mats, pillow cases… Make sure you’re keeping everything that regularly touches your external ear clean as well. You want to minimize potentially harmful bacteria from settling on or in the ear. This will reduce the risk of easily preventable ailments like ear pimples (which are not only annoying and unappealing, but can be really painful too).
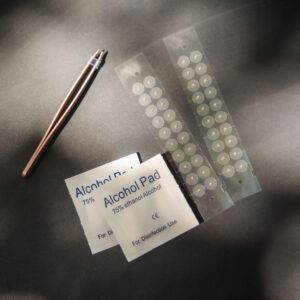
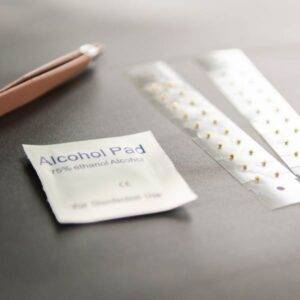
How you clean these things depends on what it is, but gentle cleansers and/or alcohol wipes are a good start for the plastic items, whereas your pillow case needs weekly cleaning in the washing machine.
The right way to clean ears at home
When it comes to cleaning, keep it simple. Use a damp cloth to gently wipe the outer ear, removing any excess wax or debris. According to Whisper Ear Care, you should avoid inserting anything into your ear canal, like cotton swabs or bobby pins – these can push the wax deeper or even damage your eardrum.
Understanding the external ear anatomy can provide valuable insights into proper techniques to clean ears at home. Let’s explore the external ear structures and how to care for them effectively.
The Pinna (Auricle)
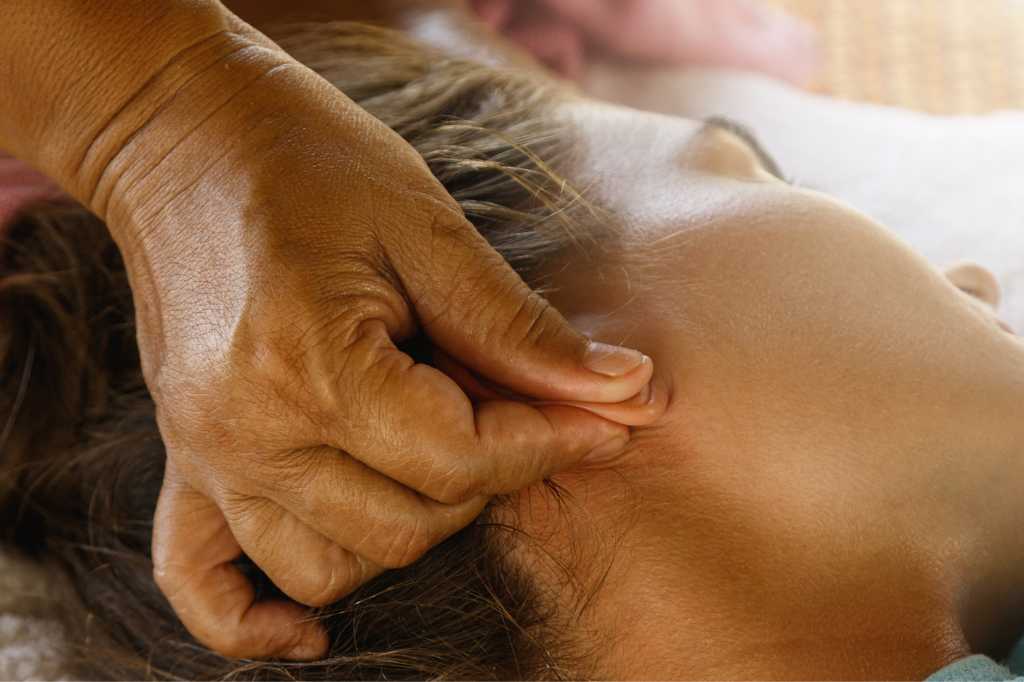
The visible part of your ear is called the pinna. It’s essential to clean the pinna gently with a damp cloth, especially behind the ear where dirt and oils can accumulate. Regular cleaning here prevents irritation and maintains a fresh feeling.
Ear Canal (External Auditory Canal)
The ear canal is a tube-like structure that carries sound waves to the eardrum. It’s important not to insert anything into the ear canal. Instead, let the natural process of wax migration occur. Cleaning the wax at the entrance of the canal with a cloth is sufficient.
Tragus and Antitragus
The tragus is the small, pointed cartilage in front of the ear canal, while the antitragus is the prominence opposite the tragus. When cleaning your ears, pay attention to these areas, as they can collect debris. A gentle wipe with a cloth can help keep them clean and prevent irritation.
By understanding the external ear anatomy and its related cleaning methods, you can maintain optimal ear hygiene. Remember, gentle cleaning of the visible parts of the ear, avoiding the ear canal, and incorporating ear seeds for acupressure on the auricle can contribute to both cleanliness and overall well-being.
7-step protocol to clean ears at home
1. Gather supplies
Start by gathering a soft, clean cloth, mild soap, and warm water. Avoid harsh chemicals or alcohol-based products (unless it’s a light alcohol wipe like you’ll find in the My First Ear Seeds Kit), as they can irritate the sensitive skin on certain parts of the ears.
2. Dampen the cloth
Dampen the cloth with warm water and a small amount of mild soap. Make sure the cloth is not dripping wet, as too much moisture will inhibit you from cleaning the ears as best as you need to.
3. Gently cleanse the ears
Gently wipe behind the ear, paying attention to creases and folds. Use a light, circular motion to remove any dirt, oils, or residue. Take care not to apply excessive pressure, especially if the skin is sensitive.
4. Rinse the ears thoroughly
After cleaning, rinse the area with water to remove any soap residue. Use a different part of the cloth or a new cloth to ensure thorough rinsing.
5. Pat dry with a clean towel
Pat the ears gently with a clean, dry towel. Avoid rubbing, as this can cause irritation.
6. Allow the ears to air dry
Whenever possible, allow the ears to air dry naturally. This helps prevent friction and encourages the skin to breathe.
7. Moisturize (optional)
If your skin tends to be dry, you can apply a gentle, hypoallergenic moisturizer. Choose a product free from fragrances and harsh chemicals to avoid irritation.
By following this simple protocol, you can effectively clean ears at home without causing discomfort or irritation. Remember, consistency is key. Regular ear hygiene routine contributes to your overall well-being.
The ear seeds connection
Now, let’s talk about ear seeds! Used in ear acupressure, these tiny seeded stickers can stimulate specific points on your ears, promoting overall well-being.
When applying ear seeds for acupressure, it’s essential to place them on the outer part of the ear. Specific points, like the Shen Men point located on the upper part of the ear, can be targeted for relaxation and stress relief.
By keeping your ears clean (not only by removing debris and bacteria, but removing oils too), you’re creating an ideal environment for ear seeds to work their magic. Clean ears prime the skin to ensure that ear seeds adhere properly, maximizing their potential to provide relief from various health conditions.
Ear seeds target specific points on your ears to help alleviate stress, reduce pain, and even improve your sleep quality. Imagine a holistic approach to well-being, right at your fingertips – or rather, on your ears! But keep in mind that ear seeds are only as effective as their usage, and ear seeds falling off oily, unkempt ears will do nothing for you.
So go ahead, show your ears some love, keep them clean, and let those ear seeds do their thing. Your ears will thank you with improved balance, relaxation, and overall well-being!